Building Bridges


A Maxitrak Blog


The embankment has seen some settling over time, and requires frequent rebalasting. All in all an interesting experiment but the trestle bridge has to be the easier option. The far end of the embankment curved away from the wall to form the bottom loop on about twenty foot radius. This is where this line stopped for a while as the other part of the loop was constructed, the two parts to be joined by the thirty foot long trestle bridge. The prospect from the end of the embankment was a little daunting to say the least with a miniature version of “The big hole at Delabole” to be confronted. This is a large slate quarry in the north of Cornwall, worked since medieval times and said to be the biggest man made hole in England.
During the war my Aunt was stationed at St Merryn airdrome near Padstow, developing and printing reconnaissance photographs taken over enemy territory. Apparently aircraft returning over Delabole had the altimeter “throw a wobbly” as they flew over the big hole, quite disconcerting when you rely so much on this for accurate height readings during clandestine flights.
When the bridge is complete passengers on the train can experience a similar phenomenon in miniature, so long as they are clutching an appropriate instrument.

Crossing over
A few years ago I bought a copy of a large scale map of our area from 1860, It shows the house in some detail, even including the garage (which must have contained a one horse power car at that time). The map showed a path round the garden, edged with decorative rocks. A “Time Team” type dig in the undergrowth revealed the path complete with some of its flint edging. The railway line from the pond follows the path but at the loop the line needed to cross the path curving right, then cross it again curving to the left. This part of the path could not be walked as trees had grown too near its edge so it was decided to cross the path on two low bridges skirting the edge of this tree. A diversion path was put in beside the track to avoid walking this section.
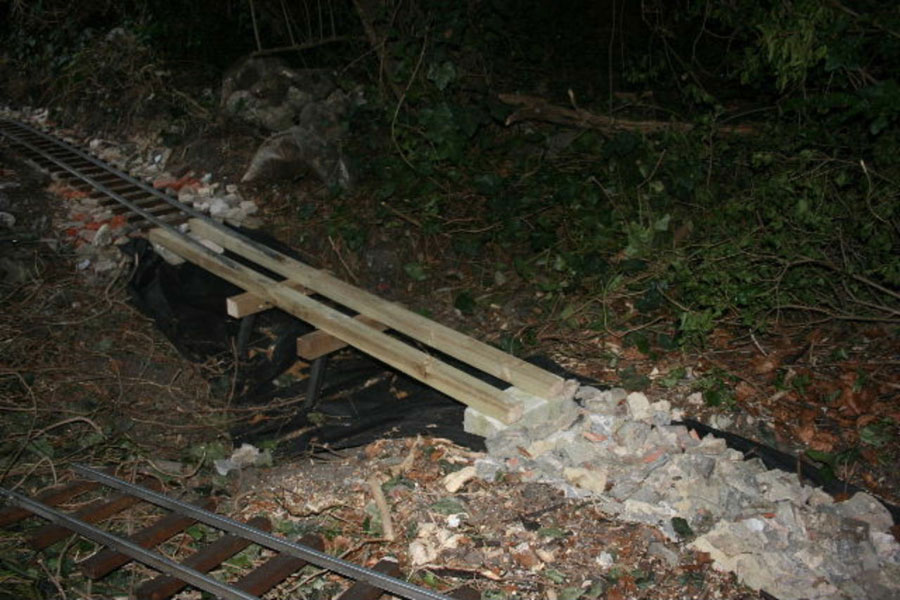
The two bridges are only some four inches off the path and represent the type of bridge you might find over a river or canal, they also had both to be on curved sections of track so the first type of bridge was quite unsuitable.


I started with two stout lengths of angle iron, supported on engineering bricks set in the ground on edge. The two pieces of angle were placed facing each other so over size timber sleepers could be placed across to support the rail. The angle was arranged far enough apart to get the curved track in place on the top. Only two of the sleepers needed to be bolted to the angle with long coach blots, one at each end. The rest of the sleepers are trapped between the two pieces of angle and held in place by the rail screwed on top.
The two bridges have been successful, and have not needed any significant attention. Like the other bridges it is the embankments either side that tend to settle while the bridge stands it’s ground so to speak. I have not felt the need to use concrete so far in the construction of the line, I like to think that things can be adjusted at a later date if required. The bridges are a good example of this though in soft ground the bridge supports would benefit from a bit of extra foundation work.

Crossing over

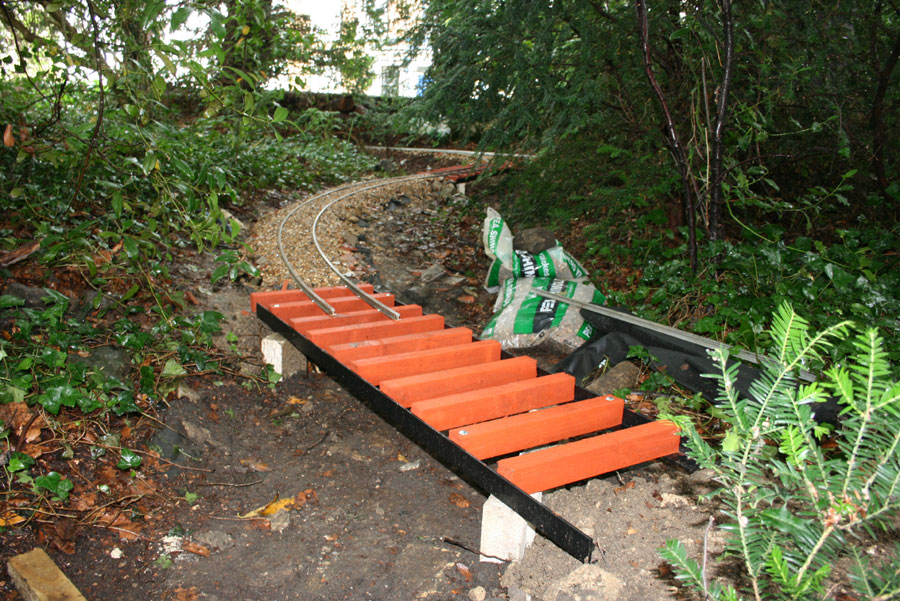
As the track sections were laid they were curved to place over the bridges. At this point I realized that it looked better if the line was laid with curves adjusted by eye rather than to a set radius. If you look at the full size you will see most track meandering through the landscape in a series of gentile curves. It is easy to get in to the “train set” mentality of straight or curved track panels all to a set size, this is not the way full size lines are laid.
To get a less toy like garden railway I would recommend setting the levels carefully but having the curves going the way they want to rather than keeping rigidly to set radius panels. This is only possible so long as you keep over the minimum radius of the line, it is useful to have the odd track panel curved to the minimum radius so it can be tried in place on the track bed to guide marking out. I used several aluminium sleeper track panels on this section of the line, curving them to suit and ending in a small embankment leading to the start of the trestle bridge.

With more bridge building to come, join us week as we tackle the trestle bridge.


© Maxitrak Ltd
10-11 Larkstore Park,
Lodge Road,
Staplehurst,
Kent,
TN12 0QY
Email: Info@maxitrak.com

in training

Share Station - Sun's out and Steaming


Isn't it nice when the sun is out and you can get outside and let off some steam?

Train puns aside, we really do love hearing from all our customers, seeing what you have done with your Maxitrak products and most importantly seeing those smiling faces that make all the hard work worthwhile. This week we have had some wonderful photos of a customers beautiful garden railway set up. Don't you just love the attention to detail

Garden Railway

Of course many of our customers build their locos just for fun  others build to share their love with the younger generation. How fantastic is this little trainee train driver jacket.I'm sure a young enthusiast has been created here, with hours of fun riding around this stunning garden railway.  

in training

Finally we have a proud customer with one of our Rustons. Looking lovely in a new coat of blue paint. I'm told there is still work to do but I think it is already looking brilliant

Ruston Blue.

Thank you to everyone who has sent us their pictures and don't forget you too can share your photos by emailing them to Info@maxitrak.com with the subject line 'Share Station'

© Maxitrak Ltd
10-11 Larkstore Park,
Lodge Road,
Staplehurst,
Kent,
TN12 0QY
Email: Info@maxitrak.com

in training

Making Tracks


A Maxitrak Blog


Having got the points in place the next step was to lay the line on from there; I started with the left fork, running down the front of the garden towards the gate. At this point I went against all the advice so far given and laid a reverse curve on ten foot radius and on a one in forty grade! This may not be quite as obtuse as at first appears when you remember this is part of the return loop so can be worked in either direction. With a bit of point changing this line can always be run in the downward direction, the rest of the loop is laid on a gently rising grade with a couple of level track panels on the other leg of the point so as to be able to get heavy trains away after a stop. If the line is operated normally then every other time round you will be going up this section, as there is a straight leading into the reverse curve you can have a good run at it. This has not been too difficult, three adults have been taken up this section by a Ruston (rated at four adults on the level).

If you are stopped with a heavy train you may need to set back and have a run at the bank. This was quite common practice in steam days on a difficult section, I recall as a child standing on the old Whitstable and Caterbury line bridge over the Kent coast main line at Whitstable in the late 1950’s with my Dad. Trains leaving Whitstable set back to get a good run at the bank, then stormed up under the bridge we were looking over. This left me covered in soot and smuts “I can’t take you back to your Mum like that” said my Dad producing a grotty old hanky from his pocket. He gave it a big lick and rubbed the smuts off my face, it still makes me cringe to think of it!

On the rails


From the curves down to the gate we are running on the big embankment, this is about the most labour intensive part of the whole line. Spare soil was dumped here over a number of years, this was added to by soil excavated from the track bed and roughly laid by eye. When I got the laser level in action on this embankment I was amazed to find I was about four inches low at the far end. As this was the end of excavations for the lower section I was a bit stumped for more soil. The answer was to dig a hole, using the soil for the embankment and then using the hole as an additional feature for the line to run over.
Embankments are best made from sub soil as it is more solid than top soil, so the hole got deeper. The embankment consumed larger and larger quantities of soil so the hole became increasingly large.

You can imagine the amount of soil needed to make an embankment some thirty feet long, two foot six tall and about four feet across at it’s highest point. As it transpires the trestle bridge took a lot less making and has required a lot less maintenance, if you do not have a lot of soil to use up somewhere then a bridge is the easiest option. The embankment was not wide enough initially, ballast was washed away by the rain so even more soil had to be added to form a trough to keep the ballast in. I was also a bit wary of a derailed train coming off the embankment and rolling down the bank if the top was insufficiently wide.

The Embankment

Join us next week for the daunting bridge build.


© Maxitrak Ltd
10-11 Larkstore Park,
Lodge Road,
Staplehurst,
Kent,
TN12 0QY
Email: Info@maxitrak.com

in training

Doncaster Show


Fom the 11th-13th Maxitrak were exhibiting at the National Model Engineering & Modelling Exhibition in Doncaster. The small team of just two, packed up some of our favourite locos and off they went. 

Shows are always an exciting experience, a chance to show off a finished product to a potential customer in person rather than through photographs. Not everyone is able to get down to our showroom and have a look for themselves so sometimes hasty snap shots are all you might see until your loco arrives. We also speak to customers every day on the phone or via email but rarely do we get to see them in person, which is another benefit of the show. We get to put a face to the names!

Maxitrak Stand
Pictured is our stand, lovingly set up to display the diverse range of models that we offer. It's not easy moving these models about but I think the boys did a great job making everything look great.
Below is a picture of our 5" Brush, it's first time at a trade show and increasingly popular.

The Brush

Here is another of our popular models, the 3/4" Allchin in all its variety. We are expecting to see these back in stock very soon.

Allchin

We'd like to thank everyone who took the time to come and speak to us over the weekend, to look at our models or even just for a chat. We really do love meeting the customers and it reminds us just why we do it.

© Maxitrak Ltd
10-11 Larkstore Park,
Lodge Road,
Staplehurst,
Kent,
TN12 0QY
Email: Info@maxitrak.com

in training

Maxitrak Needs You!


Are you a Maxitrak customer who wants to share all your hard work?

Well, it's always incredibly exciting and rewarding when we receive updates on our locos. As such, we thought it was about time that we paid tribute to you, the community and share your progress with all the other enthusiasts out there. Perhaps a problem you encountered and the way you overcame it could answer another engineers question. Proud of your paint job, or just looking to show off one that was done in-house. Or perhaps you are going the whole way and building your own garden railway and would like to share your experiences.


We are looking for your photos, your stories and most importantly your feedback on our products. Please contact us here with 'Maxitrak Blog' as the subject line. By doing so you give us permission to upload images to our site and share your stories.

Below is one of our 5" Alice's running on a fantastically scenic line in sunny Germany. Our locos find their way all over the globe,  as close as Europe all the way to the US and Australia. I can only imagine they run on some equally beautiful tracks.

German Alice


© Maxitrak Ltd
10-11 Larkstore Park,
Lodge Road,
Staplehurst,
Kent,
TN12 0QY
Email: Info@maxitrak.com

in training

Get To The Point


A Maxitrak Blog


With the rockery section almost complete the track led us towards our first bridge.I think bridges add greatly to the enjoyment of the ride and never miss an opportunity to build one. This first bridge was a small affair over a dry gully specially excavated for the purpose (I did say I never miss an opportunity and I'm also not opposed to creating one). As there were bigger and better bridges to come I used this as a chance to experiment with construction methods. I started with an A frame construction with two pieces of angle joined by a substantial cross member. The track it’s self is mounted on two longitudinal sleepers fixed to the top of the A frames. The first problem was when the angle was hammered in to the ground it encountered stones and rocks which threw it off course making the frame difficult to line up. Having reached the correct depth the angle was not particularly solid. On a small bridge like this the short comings were not a great problem but this was not the way to make any larger bridges.
What did look good to me was the longitudinal sleepers, I like the fact that it is not conducive for walking on by full size people and that the bridge looks completely different to the rest of the track.

Bridging the gap

After crossing the bridge we have a short curve round a tree and then on to a longer straight section. This part of the track is laid under a line of large fir trees, the ground under them does not support much undergrowth so track laying was straightforward.
There was a bit of ivy to clear and then the track bed was dug through the leaf litter down to a solid base. The end of this section leads us in to the bottom loop, the gradient here eases as we get to the point. Up to now the line has been completely pointless, this is where the point goes in, if you get my point.

I have tried to avoid cutting established trees and bushes as much as possible, this has meant going round obstacles often on ten foot radius. We have not flinched from doing this even if there are several ten foot reverse curves to be negotiated as at this junction.
The construction of the point is unusual, it is a ten foot radius Y with a snap over change mechanism. Most points are quoted with one line to a particular radius and the other line straight, my one has both lines curved sharply away from each other, both on ten foot radius. This changes the geometry of the point completely, there are only four sleepers between the blade end and the frog, and the frog its self is a much sharper angle. We used a frog from a diamond crossing for this point as the normal ten foot frog would be miles out.
.

All A bit pointless


The snap over point change mechanism is used so a train entering the loop can exit over the point setting it to the opposite direction. When the train returns it will go the other way round the loop and set the point back to the first direction when it exits. This means driver and passengers get a completely different view round the loop every time.
As the point blades are short they run right up to the frog without a joint, the whole section needs to move when the point is changed so the screws fixing the blades need to be lose enough to allow this. The spring changeover mechanism does a second job of holding the blades hard up against the frog, without this the blades would not stay in place. The gap between blade and stock rail is kept large to help the spring snap the blades over center as it is changed in each direction. In spite of its unconventional nature this point has been most successful and never given a moments trouble since installation.
It requires a little oil to keep it free, steam oil was tried but proved too thick on cold days resulting in the mechanism not snapping over when pushing light stock back over the point.

I have not been able to enjoy the reversing action of the point controlling the loop yet as the line has to be worked once forward and once backwards until the top loop is completed. Each direction of travel always goes the same way round the loop unless you manually change the point at some time. I may need to alter the change mechanism with a one way spring or lever if the line is to be run with two or more trains, a train waiting in the bottom loop finds its self nose to nose with the incoming train if the point is left to its own devices!

In Cuba on the sugar lines each train has a man on board who’s job is to get off and set the points ahead, this is in addition to the driver, fireman, lines man complete with telephone and any other hangers on wanting a ride. On the garden line it is the driver who has to perform all these functions for himself. There was one memorable Cuban footplate occasion when the entire crew consumed two buckets of beer, handing it round in coke tins with the tops cut off and dipped into the bucket for a refill. This was all very well but the driver, having consumed several tins full, misjudged the siding on our return to the depot and backed into several bogies at the end of the line. On my line the company rules state that all beer should be kept in bottles, not buckets.

All A bit pointless 


© Maxitrak Ltd
10-11 Larkstore Park,
Lodge Road,
Staplehurst,
Kent,
TN12 0QY
Email: Info@maxitrak.com

in training

Newer posts → Home ← Older posts